Surface roughness measurement
Your needs : measure the roughness of a surface to ensure quality and conformity
Measuring surface roughness helps to guarantee product quality, compliance with industrial standards and performance. It helps to optimise manufacturing processes, improve the durability of parts, and prevent failures such as wear, corrosion or coating adhesion problems. Indispensable for demanding sectors such as aerospace, automotive or medical devices, roughness analysis helps you ensure control of your products at every stage.
The different types of surface roughness
Surface roughness can be characterized in different ways depending on the types of irregularities and surface profiles. There are several types of surface roughness, and the FILAB laboratory offers analyses to measure them.
Primary roughness (Ra)
This is the type of roughness most commonly measured and described. The higher the Ra value, the rougher the surface. This measurement is used to assess the overall quality of the surface.
Maximum roughness (Rz)
Maximum roughness, or Rz, measures the distance between the highest and lowest points on a specific sample length. This gives an indication of the greatest irregularities on the surface and is often used in applications where extreme peaks or valleys are critical.
Mean peak roughness (Rp)
This measurement indicates the average of the heights of the highest peaks relative to the centre line of the surface. It is important for surfaces in contact under pressure, where peaks can play a major role in friction or wear.
Profile roughness (Rt)
The Rt parameter measures the total roughness amplitude, i.e. the vertical distance between the highest and lowest points of the surface. This is an important measurement for parts where extreme irregularities must be avoided.
Quadratic mean roughness (Rq)
Also known as RMS (Root Mean Square) roughness, this Rq measurement is often used to assess roughness in situations where a more detailed statistical analysis of the surface is required.
Corrugated surface roughness (Waviness)
This is the measurement of larger-scale surface irregularities caused by factors such as machine vibration or defects in the manufacturing process. Wavy roughness represents variations that are slower than fine roughness, but which can have a significant impact on surface integrity.
Directional roughness
Directional roughness refers to the orientation of surface irregularities. It is often associated with specific machining processes, such as milling or grinding, where the surface patterns follow a certain direction.
In summary, the different types of surface roughness allow irregularities to be characterised according to their amplitude, distribution or direction. Each of these measurements is useful for specific applications, depending on the requirements of the industry or the product to be analysed in the laboratory.

Our solutions : FILAB can help you measure surface roughness using its state-of-the-art equipment
Our technical resources for roughness measurement
Nanoscale roughness can be measured using high-precision instruments such as Atomic Force Microscopy (AFM), which uses an extremely fine tip to scan the surface and detect variations in elevation at the atomic scale, providing a detailed profile of irregularities.
For more advanced analyses, Scanning Electron Microscopy (SEM), coupled with Energy Dispersive X-ray (EDX) analysis, not only enables the topography of the surface to be visualised at high resolution, but also identifies the chemical composition of the elements present on the surface.
Finally, X-ray Photoelectron Spectroscopy (XPS) is used to analyse the chemical composition of the first atomic layers, providing an overview of the elements present and their chemical state, which is essential for understanding how roughness can influence the physicochemical properties of a surface, particularly in fields such as nanotechnology and high-performance materials.
How is surface roughness measured on materials ?
Surface roughness is measured using techniques and instruments adapted to the specific characteristics of the materials. Each type of material has properties that influence the appropriate measurement method, depending on its hardness, structure and end use.

The measurement of surface roughness varies according to the properties of the materials. Contact techniques are ideal for rigid materials, while non-contact methods are preferred for sensitive, soft or smooth materials.
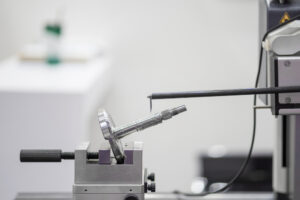
- Common techniques : Contact profilometers are frequently used to measure the roughness of metals. A stylus is moved over the surface to record variations in height. This method is accurate and suitable for hard, robust surfaces.
- Applications : Aerospace, automotive, mechanical engineering.
- Common techniques: Plastics are often measured with non-contact profilometers (optical or laser), as these materials can be easily marked or deformed by a contact stylus. Optical techniques use light reflection to detect surface irregularities.
- Applications : Moulded parts, packaging, medical devices.
- Common techniques: Interferometry is used to measure the roughness of very smooth materials such as glass and ceramics. This method relies on light interference to capture microscopic variations in the surface.
- Applications: Precision optics, screens, lenses, electronic components.
- Common techniques: Non-contact profilometers are preferred for rubber surfaces, which are too soft to be measured with contact instruments. Laser and optical technologies allow precise measurement of roughness without deforming the material.
- Applications : Seals, tyres, shock-absorbing components.
- Common techniques : Optical and laser profilometers are used to measure the roughness of coated surfaces. These methods make it possible to assess the evenness of the coating without altering the applied layer.
- Applications: Protective coatings, anti-corrosion surfaces, automotive paints.
- Common techniques : Non-contact profilometers are frequently used to measure the roughness of composite materials, as they are often made up of layers of different materials. Optical analysis is used to capture surface variations while preserving the integrity of the material.
- Applications : Aerospace, automotive manufacturing, sports equipment.
These measures are essential to guarantee the quality, durability and performance of products in a variety of industries.
Our services
Roughness analysis
Coating analysis
Surface analysis
Surface deposit analysis
FAQ
Roughness measurement is essential to guarantee the performance, quality and durability of industrial parts. It enables critical parameters such as friction, wear, coating adhesion or sealing to be controlled, and manufacturing processes to be optimised. Poor management of roughness can lead to failures, inefficiencies or additional costs due to rework and maintenance.
Many industry standards (ISO, ASTM) require surfaces to meet specific roughness criteria. By measuring surface roughness, companies can ensure that their products meet these standards, guaranteeing product conformity, quality and safety, while avoiding rejection or penalties for non-compliance.
There are specific techniques for analysing the roughness of delicate or complex surfaces, such as fragile materials, composites or parts with complicated geometries. These methods make it possible to measure without altering the surface, while obtaining precise data tailored to the specific characteristics of the material.


